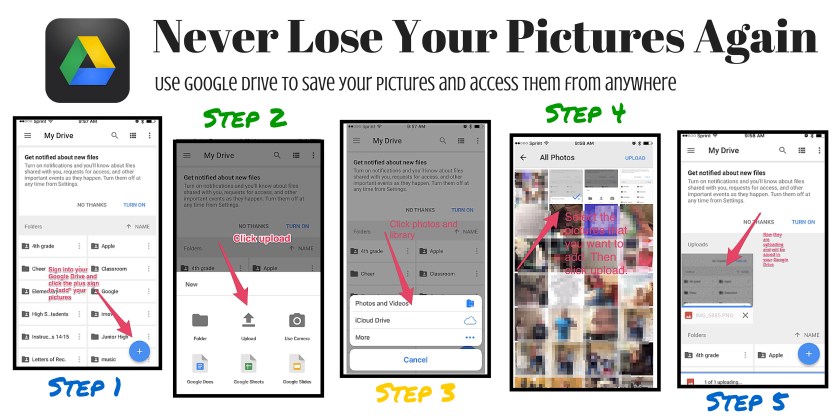
This is an infographic that I created to show you how to save your pictures in your Google Drive. If you have any questions please feel free to contact me via Twitter @daisyray215

This is an infographic that I created to show you how to save your pictures in your Google Drive. If you have any questions please feel free to contact me via Twitter @daisyray215

Y’all know it is. So many demands. The list. The list rules my world. The time crunch. Many afternoons I get home and just crash and burn. No strength left to do the laundry or the dishes or take the kids to the park. Often the mundane tasks of just daily life can take a huge toll on us. We become whiney. We start to believe that everyone and everything is against us. We become joyless. We walk around with a puckered up face like we are eating a lemon. It is shameful to admit, but I get asked (a lot) why I have such a bad look on my face. I truly didn’t realize that I did, but I am guilty as charged. I think I am just in a constant mode of deep thought. I am checking off the ever-growing list in my mind while simultaneously trying to think of new ways to change the world, you know?!
Then this morning a bible verse reached out and smacked me upside the head. You know what I mean. That’s what God does to get our attention when we are focused on too many other things.
Matthew 10:8
“…freely you have received, freely give.”
And the conviction began. I instantly realized the state of selfishness that I often live in. How many times do I snap at people because I am stressed? How often do the people around me get the bottom of my barrel attitude? When I walk the halls of the school am I intentionally being a kind human being? Am I intentionally throwing joy around like confetti? Yikes.
When people push my buttons, step on that nerve, and just make me cranky…what is my reaction? How do I treat them? Do I disregard them and put my emotions and myself first? Yes, usually I do. However, Jesus said, “…freely you have received, freely give.” I am so underserving of everything he has given me, yet he gave. He gave freely. He gave regardless of how he felt day to day, and he did it without grumbling. He served the entire human race, always putting others first. He is looking down on us watching our every move. He doesn’t disregard us when we do the wrong thing or make a monumental mistake. He doesn’t give up on us. He is rooting for us. He isn’t rude or snide. He gives us another chance. HE is our biggest fan and our biggest cheerleader. This is one more reason why my prayer, my heart, my struggle is to be more like Jesus. Whether it is my family, my co-workers, the kids at school, or the babies in my AWANA group – please Jesus let me love them like you do. Don’t let me disregard them.
Life can be hard. It can be tiring. However, we were placed here to serve others. So serve joyfully. Kids deserve our best, and so do adults.
My challenge for myself –
The love that Jesus gives…freely give.
The grace that Jesus gives…freely give.
The mercy that Jesus gives…freely give.
The joy that Jesus gives…freely give.
The hope that Jesus gives…freely give.
The forgiveness that Jesus gives…freely give.
The patience that Jesus gives…freely give.
 So, I have been quiet lately. Working harder than ever. Learning more than ever. The plan for the year was for Cherie and I to soak up every drop of knowledge that R.L. (builder & king of the Warren ISD technology movement) so kindly bequeathed upon us. Man, it was hard. Fast-paced and never ending. My brain hurt(s). He shook his head a lot at my lack of understanding (if you know him you are picturing this right now), but he had faith in me. He didn’t give up. He is absolutely one of the best mentors anyone could possibly have, and for that I am grateful. Most of this year I have been in survival mode with the words of Dori moving me along the way, “Just keep swimming. Just keep swimming.” Cherie and I have cried (a lot), we’ve laughed (a lot), we’ve failed (a lot), and we have learned (a lot). Through the past months there are four things that I have come to stand upon as truths and hope for the future of the Warren ISD Technology Department: R.L. built an amazing foundation for Warren ISD that will last for decades to come, Cherie can seriously figure out anything (genius level), I love to learn and get to learn new things every single day, and that the previous combination will ensure that Warren ISD will continue to grow in the area of technology.
One new endeavor that Cherie and I have been working endlessly on is a way to help teachers alleviate some of the stressors that come with having twenty students in a classroom with the world at their fingertips, which sometimes can be a good thing – and sometimes it can be a [bad] thing. Without using a bunch of technological jargon that makes me sound a lot more intelligent than I am – let me talk about our latest venture. We have purchased a management system for our school’s iPads called JAMF. In short, JAMF can help schools inventory, deploy, and secure each iPad that they have purchased with ease. We knew going into this project that it would be a huge undertaking. We also knew that it would be well worth it. Once we have completed the initial push the whole process of iPads will become smoother for us and for the teachers. When we decided to go ahead with JAMF we looked at the system from two points of view: the teachers and the students.
1.Teaches have a job to do, and they are incredibly passionate individuals that work hard and spend long hours planning out how to execute the perfect lesson for their students. Teachers are preparing future community members, doctors, engineers, etc. for a world that is in a constant state of change. We have TEKS and curriculum and testing and the list goes on and on. And more often than not, we feel like there just is not enough time in the day to get it all completed. Teachers need students to be focused on schoolwork during class time so that they can be successful; however, we gave the students iPads, which made them privy to social media and games and videos. Thus, taking their minds off of class work and on to more “interesting” subjects. Teachers need students to pay attention, so that they are able to prepare them for their future. After all, Snap Chatting the class period away won’t get you an A on an exam. The quote “There is a time and place for everything” rings true. A time to learn and a time to pin. A time to test and a time to “selfie.” I digress.
2. We want learning to be fun. We want to capture students’ attention. We want them to be creative, out of the box thinkers. So, we give them an iPad. We want them to WANT to use the iPad. We want the iPad to enhance their learning in a way that will prepare them for this crazy technology-driven world that we live in. We want learning to be at their fingertips. We do not want them to hate the iPad, so we (the tech department) are adamant that students do not lose their freedom per say. We don’t want to take their app store away, or their music, or their games. If we did then the iPad would merely be a textbook. They would not take ownership of the iPad. We want students to become good digital citizens. We want to teach students to make the right choices. We don’t want to make the right choices for them. So, we left the app store and the music and the social media. Because these things are not bad. They just need to be used (and taught) appropriately. Because “There is a time and a place for everything”.
So, the solution that we found is JAMF. This allows teachers to “Focus” students in on one thing at a time. If a teacher decides that students need to work in Google Slides for the class period then JAMF will allow this to happen. No straying to Instagram or Pinterest while you should be working on a project. However, when students leave that class and go to lunch, or home, or to the library they can then access their music and games and apps. They are free to dream big on Pinterest or design their dream country on Minecraft. It seems to be the perfect medium for teachers and students.
We are still working out the kinks and learning more about this program every single day. We are anticipating it to be a successful new component to the WISD Technology Initiative. We will certainly let you know.
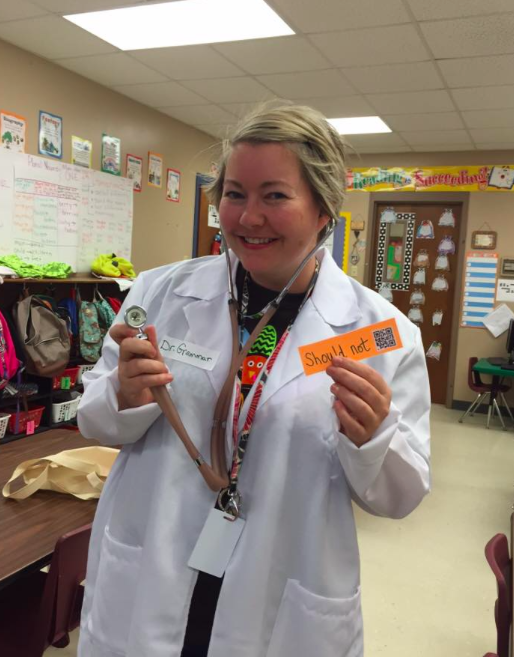
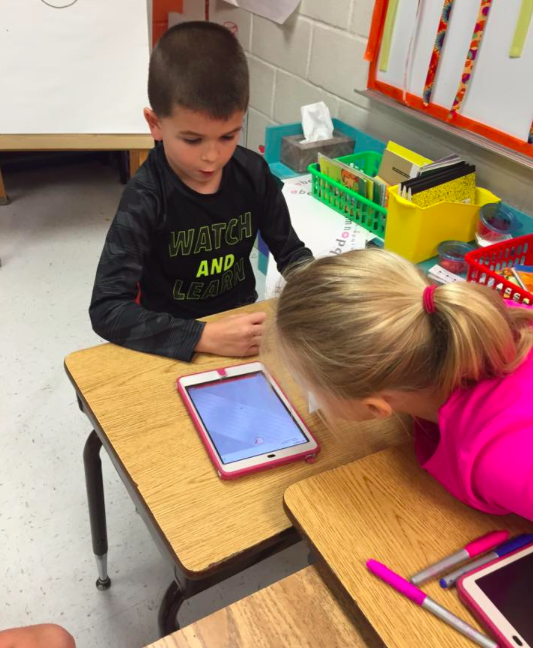
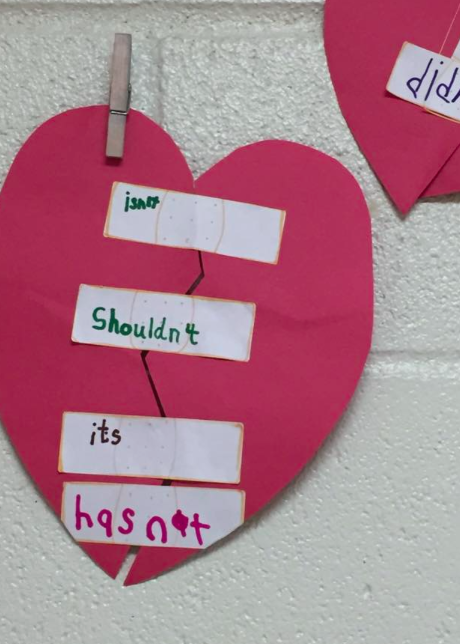
Today I had the opportunity to go into a first grade classroom and work on a mini lesson with the class that incorporated technology. Ms. Reynolds had already introduced forming contractions to the class, so my goal was to bring a fun activity to reinforce this concept with her students. I came dressed as a doctor because doctors “fix” things, and we had words to fix. I wanted this lesson to be engaging to all types of learners. I wasn’t just going to bring technology because let’s be honest…technology doesn’t resonate with every student. So, I brought some cut outs, some little booklets, some stickers, and some technology. This way every type of learner was targeted throughout my mini lesson. I made some simple QR codes and taped them on an index card that had two words on it. The students had to form the two words into one. For example: I am = I’m. When they scanned the QR code it gave them the correct contraction. This enabled the students to check their work before they wrote their word on the bandaid. The class was placed in little pods and worked together as groups to complete this project.
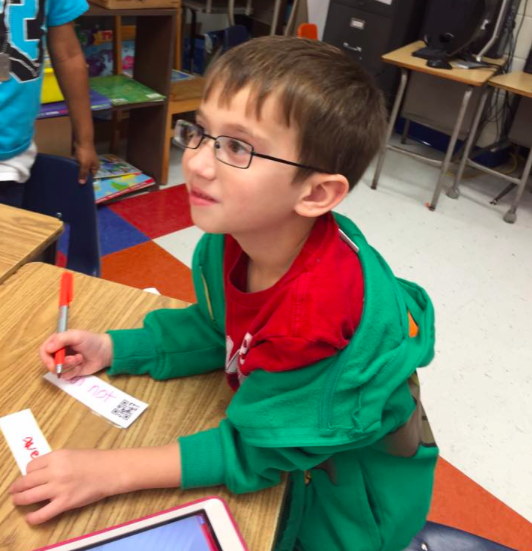
Each group had a broken heart, a “bandaid” for each student, markers, and iPads. The students looked at their words and tried to figure out the correct way to put them together. Then they scanned the QR code to check their answers. The next step was for the students to write their fixed word on their bandaid. They then put the heart back together by using the bandaids as stickers.
My point is that technology does not have to be some big to do in your class. It’s just a tool – like a marker, pen, or a sticker.
GUIDE TO SETTING UP YOUR COMPUTER
*This message has been RL approved
Walking into your classroom the first week of school and seeing a million cords everywhere can be pretty intimidating. I hope that this guide will help alleviate SOME of that stress. Don’t forget – email Cherie or myself if you need anything at all. Do not let this stress you out!!!
INTERNET
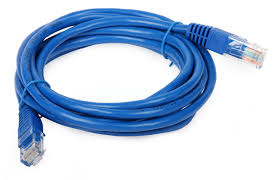
Ethernet Cable
Ethernet cables are used to hook up to the local area networks. You may have more than one of these cables in your classroom at the start of the year. One side of this cord will plug into the back of your computer, and the other side will plug into either a switch or the wall. Each computer requires an Ethernet cable.
Below is an example of a switch:

|
Document Camera |

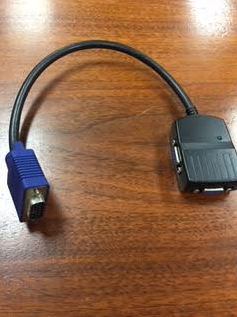
Above is an image of a VGA cord and a VGA port. VGA stands for Video Graphics Array. This transports video signals. We use VGA cords in the following ways:
Below is a VGA Splitter:
Below is a VGA Switch:

|
ACCESSORIES
|
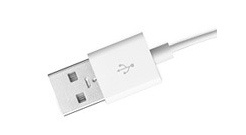
Above is a USB cable. This is what the cord on the end of your mouse and keyboard look like. You will connect these cords into the back of your computer into the USB ports. This is also what one side of your iPad charging cord looks like. You can plug your iPad/iPhone into the USB port on your computer to sink data and save to “THE CLOUD”.
|
SmartBoard |

Above is a SMARTboard Cable
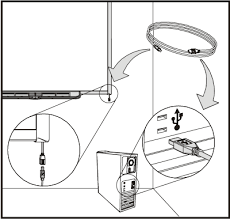
The above diagram shows you how to plug in your SMARTboard
This is what your SMARTboard cable looks like. It is a USB cord. The end that is square shaped plugs into the SMARTboard. The above diagram shows you where to look to attach the cord. The rectangular shaped ends plugs into a USB port on your computer.
*Images retrieved from www.kalvster.com
*Images retrieved from www.cables.com

Let me preface this blog by saying that I LOVE social media – when used correctly. There are tons of people that use it properly. Those people are modeling correct Digital Citizenship for children and adults all over, and for that I am thankful. Here is a conversation that I had to have with my 11-year-old son a few weeks ago. Maverick is a really good kid, and he hangs out with really good kids. But I am no fool. Pictures get taken, posted, skewed, and I am going to try and protect him from that as long as possible. The other day he asked me if he could get an Instagram account. Although I totally trust Maverick, and I feel that most of the pictures would be of Megatron, I had to tell him no. My number one reason is because I am not going to lie about his age. Instagram asks that you be 13 before you have an account. Maverick is not. I am not going to lie and say that he is 13, and I am not going to let him lie and say he is older. I told him this, and he totally understood. I also do not trust what other people are posting. He would potentially see things that an 11-year-old child does not need to be exposed to. You know that infamous hashtag? You never know where it is going to take you. I don’t want Maverick to type in something innocent that takes him to something- not innocent. This was an important conversation and moment for us as we were able to target Digital Citizenship, good morals and ethics, and Frank and I were able to give Maverick reasons that he wasn’t quite ready to navigate through social media. Although I am teaching Maverick daily about his Digital Footprint, as his mother I know that he cannot quite grasp how detrimental one wrong post or picture could be to his future. Instagram gets that, or they would not have made the age 13. As he grows and matures he will be put in situations where he has to make small decisions that could make a big impact. He will start to see how one wrong choice, even if it doesn’t seem like a big deal at the time, can change everything. These are conversations that we all need to be having with our children and our students. Internet sites like Google take snapshots of everything that you post. So, delete it all you want…but Google has it forever. Maybe it doesn’t seem like a big deal if Maverick posted something about a certain college “stinking”, but that one small post at age 11 could come back to haunt him later on in life. Let’s say he decides to go to that college and ends up in a competitive situation for a spot. The college WILL do a search of Maverick, and no matter how many years ago he posted that one little sentence, it WILL show up. Why would a college want someone talking bad about their school when they could choose a child that is saying positive things about their college? The same goes for students posting pictures of partying and other activities that maybe shouldn’t be publicized so freely. Extreme? I don’t think so. Why would a place of employment or a university want someone that is perceived as a partier when they could choose the person that looks like they will take things more seriously? People, the media – anyone can take a picture/situation and totally change the meaning of what was really happening. It is my job to teach my kids to be really careful when people are taking pictures, when people are “tagging” you in pictures, and when people are recording you. I love social media. I love being able to connect with people from all over and truly learn from them. It is my duty to model how to safely and successfully use social media for my kids and my students. Adults, they are watching us. They are looking to us for guidance. I challenge you to research the different apps that teenagers are using right now so that you will know what your child is involved in virtually. I challenge you to model how to properly use social media, and I challenge you to talk to your kids about this. We didn’t have to deal with this when we were children (thank goodness), but they do. If we don’t guide them then who will? Check out the following tips and apps that are circulating right now. Just remember, they are changing daily.
My number one tip to help your child when it comes to social media is to be proactive. Talk to them daily. Model the correct way to use these resources. And NEVER post anything that you would not want them to see. Show them how great social media can be when used correctly.
Here are the steps that a parent can take to prevent their children from downloading apps that are age restricted – or are supposed to be. Just like movies, apps have ratings. Kik is rated 17+ in the app store. If you use Apple products you can fix the App Rating restrictions on your devices to prevent your child from downloading apps that are not appropriate for them. Click here to find out how. You don’t have to do this every time. Once you have set it, as long as your child doesn’t have the password, you are good. If you use another device and do not know how to do this, shoot me an email and I will research it for you. When your child gets old enough, yes – let them know you can trust them and back off the restrictions, but for now we are the adult. Not their friend. Not cool at all. I cannot stress enough the importance of constantly talking about this topic together and the potential scenarios that could happen.
Kik – You are supposed to be of college age to use this app. Why? Because there is inappropriate content floating around on Kik. Kik is a free text messaging service. Why do you want a service to text message through when you can already text on your phone? Well, people that prey on small children love this. They find your child’s username and easily contact them. They can lie about their age, become their friend, ask to exchange pictures, then maybe addresses. You see where I am going with this. Your child can say that their username is private, but is anything really private? Most teens and tweens take snapshots of their Kik names (amongst other things) and then publicize to “follow” them on their other social media accounts. So, then someone can take a snap shot of that and repost it, and then so on and so on and so on. You never really know who is seeing your pictures and statuses. Your student may really believe they are “private” and safe, but it is up to us as adults to coach them on true Internet safety. This is a good chance to share with them different scenarios. Just Google Kik with your child and show them real life scenarios that have happened to other children/teenagers.
Ooovoo – These is a video app. Once again, I do not see any reason that my kids should be using this. The draw is that you can have up to 12 people on a video chat at once. That’s fun for kids, right? So, what could go wrong? Your child could see or hear something that they do not need to be exposed to. Your child could potentially say or do something that could go “viral” and follow them the rest of their life. Oh, that won’t happen to me? Just Google Justine Sacco.
ask.fm – This is the one I dislike the most. This is the perfect platform for bullies and pedophiles. First of all, a lot of parents do not know their child is even using this because you have to know their specific username. The claim to fame is that the app is anonymous, and kids can post what they want without others knowing that it’s them. Kids and strangers are asking questions that should not be asked. Example: Why are you ugly? You should kill yourself. That is so detrimental to tweens and teens. Even adults. To read more about ask.fm click here.
Facebook, Twitter, & Instagram – They all want you to be 13. They all save everything you post forever. Teach your children to choose their words and pictures wisely. How do they want to be perceived? These sites are easier to monitor what your children are posting, but you can never really monitor what they are seeing unless you are sitting right beside them the entire time. When my children start using these sites I will challenge them to “change the world” with their words. Show kindness and love instead of speaking hate.
Whisper Secret – Click here to instantly see why you do not want your children & teens accessing this site.
There are so many other apps and platforms that children and teenagers have access to on a daily basis. I could never list them all, but I promise to keep researching and staying on top of the current trends. I am obligated as a mother, a teacher, and an adult to be proactive when it comes to Digital Citizenship. It’s my job.
We had a great turn out today at Warrior Tech Camp. This is the third year in a row for Cherie and me to put this on for the faculty at Warren, and it is always a really fun time for the both of us. We love researching different ways for teachers throughout the district to infuse technology into their classrooms. Today Cherie took the “advanced” iPad users, and I took the “beginners”. We stayed pretty basic in my class; however, I did walk them through a Nearpod, which is a tool that I love. I promised that I would post the resources that I used today on my blog for teachers to go back to. I want to thank Angela Moses, Karen Ford, and Steven Cox for helping me in the beginner group. Click on the following links for resources that we used today:
1. Tips & Tricks for new iPad users
2. Socrative
3. Kahoot
4. Nearpod
5. ThingLink
God just got in my business. All in my business. I was at Walmart buying school supplies this afternoon. It was hot and crowded, and I wanted to be home. Maggie was seriously so excited, but in the back of my mind I kept thinking, “How much is this going to cost?” I see it every year on Facebook at this time. Parents complaining about the school supply list, the amount of items on it, and the amount that it will cost. I am a teacher, and I know the items on the list are needed. They really are; however, I also have a budget. So, like many parents in America I was begrudgingly putting item after item in my basket. And then God got in my business. This is what he said, “Be glad. Be thankful that you can buy these school supplies.”
Ouch. He was right, and here are the reasons why:
1. Maggie was so excited about the school supplies. Be in the moment, Daisy. Be excited with her. They are only little for so long.
2. I can afford these supplies. Some people truly can’t.
3. I went to college in hopes to provide my kids with a good life. Right? The best thing I can give them is a love for Jesus and an education. People can say what they want about the education system in America today, but I think it is pretty darn good. Look around us. There are countries that do not have clean water or school buildings, but I have the ability to arm my children with tools to learn with. Our schools have great teachers, air conditioners, clean water, food, love, books, and so much more.
4. Some people would love to be able to buy school supplies. A parent that has lost a child. A person that was unable to have children. A single mother or father barely staying afloat. Maybe a parent that messed up early on in their child’s life and wish they could start over.
So, that’s it. My convictions for today. When I think about everything that I have I know I am absolutely blessed beyond measure. I am thankful for the ability to be able to purchase school supplies, clothing, and shoes for my two children. I also know that I can cut back somewhere else so that I am able to provide supplies for other children in my community. My challenge to you has two parts:
1. Buy supplies for your own children with a thankful heart. Pray that these tools will help them to be successful.
2. Help someone else out, too. We have so much. Let’s give back.

Maverick & Maggie – my heart and soul
Even as I write this blog I am struggling with the fact that I will be putting my raw emotions out for everyone to read. I like positivity, and I like happy. I don’t like seeing negativity spewed all over social media because it makes me sad; however, I feel like this is a post that I need to write for myself and for my kids, so when I look back in a few years I don’t forget the struggle. Because the struggle has been very real. I said I would never go to grad school. I had my teaching degree, and that is all I ever wanted. I did not need to go any further because being a teacher (and a mom) was my dream since 2nd grade. But…..I came to a stand still. I was over the TAKS, the STAAR, the worksheets, the mundaneness of doing the same thing over and over. Then Warren ISD adopted a 1:1 iPad initiative. The community as a whole was very hesitant as what this would mean for our students. Teachers were concerned and administration did not know how all of this would pan out, but there were certain people put in place that knew whole heartily that this was the best decision for student success in the 21st century. After all, isn’t that what this is all about? Thank goodness that all of this started happening because it ignited something inside of me that had disappeared after years of boring lesson plans and teaching to the test – guilty as charged. We were so excited. There were so many cool things that we could do with the new technology in our hands. After forming PLN’s on Twitter our eyes were opened up to a whole new world again. Project Based Learning, Augmented Reality, thinking outside of the box, collaborating with other teachers and students from all over the world, all of these things made lesson planning exciting again. I could not wait to get to work the next day to see my students actually excited about learning. One thing led to another and my assistant principal decided to sign me up for grad school. She paid the admission and everything. And just like that I was going back to school. I was really excited, scared, doubtful, so many emotions all rolled up into one. I was so scared that this would take too much time away from my kids. I did not want them to feel slighted. I did not want them to grow up thinking that their mom thought other things were more important than them. I have struggled with these emotions the entire span of grad school. I have cried. I mean ugly cried. I do not even want to say how much stress chocolate I have eaten. I have wanted to give up. A lot. My oldest sister literally had to talk me down a few months ago (over text messages) because I was so utterly overwhelmed that I did not think I could see this thing through. My husband would take the kids out for the day to allow me to work on homework, but then I would sit here feeling guilty because I wasn’t with them and sad because I wanted to be having fun, too.
I have even struggled with my Christianity throughout this grad school thing which makes my heart hurt because Jesus is and always will be my top priority. I have not read my devotionals like I should; however, I have prayed just as hard as I ever have. I can promise you that without my prayers and the prayers of my family and friends that I NEVER would have made it through this. I have not missed church no matter how tired I was. But I have had to listen to some people make pointy comments toward me. Things like that really get in your head. Make you question if you are doing the right thing. Questions about my lack of cooking. Questions about me going back to school in general while my kids should be my main focus. Some have questioned me as to why I want to teach my daughter all of this “technology” when I should be teaching her to cook and clean and take care of a house. “We should be teaching our daughters to take care of a husband and her kids,” they say. Well, I agree. However, I will also teach my daughter how to take care of herself so that if something happens to her husband she will not have to depend on or run to another man to take care of her. She will be able to take care of herself. There is not a thing wrong with a woman having an education. My husband has an MBA that he earned two years ago while having two small children. No one questioned him. No one asked him if he thought that meant he was putting things before his children. I am lucky that he feels just as strongly about education as I do – for our son AND for our daughter. He also does not mind eating a bowl of cereal for dinner because his wife has homework. (Thank goodness)
Yesterday I passed my LCE, and when I got in the truck I cried. Relief, I guess. Knowing that I am so close to being finished. Maybe. When I started grad school I said that I was not going to “walk” that I would just get them to mail me my diploma. I have definitely changed my mind. I may do flips across the stage. This is the hardest thing I have ever went through. Not the classwork (I have a 98.3 cumulative average) but the time management, the many different hats that I wear daily, working full time, wanting to teach my students awesome things, wanting to teach my kids about Jesus and about kindness, balancing it all, and the occasional laundry – just feeling worthy as a mom and a woman in general in this Pinterest crazed era. You know what I mean. So props to all you moms that are doing it all, being it all, hugging your babies, and being the best YOU that you can be. You are AMAZING. You are not anyone else, so don’t compare yourself to them. My kids are proud of me, and I know without a doubt when I walk across that stage that Maverick and Maggie will be standing up screaming my name, which is Mom.
Psalm 46:5


Mrs. Marino’s 4th grade class heads to NYC
Do you ever wish you could take your students and show them the real world? Are you low on funds? What teacher isn’t! Last week while surfing through Pinterest I saw where @TechChef4U (follow her on Pinterest, Facebook, and Twitter) had pinned a blog about virtual field trips. What??? I was intrigued. It just so happened that we had just written a narrative on “My Best Field Trip”. Instantly, I thought why not take the students on a virtual field trip and then have them write a narrative about that. We can compare the two narratives, make a ThinkLink, make a Popplet, etc. Once again, this shows you the power of Twitter, Pinterest, etc. If I were not searching through other teachers’ ideas, I would have never thought of this! I digress. This truly was one of my favorite lessons that I’ve taught in eight years. I did not tell the kids that I would be taking them on a “trip”. I wanted everything to be a surprise. When they walked into my room that morning I told them to get their binder and a pencil and come sit in front of the SMART board. I already had my MacBook and the Apple TV ready to go. Beforehand, I printed out a sheet that had four empty squares on it for students to write down interesting facts that they learned. Once we were settled, I told the kids that we were going to NYC. Out of 65 kids only four students had ever traveled there, and one of those students was my son. The kids never questioned me on how we were going. They never said we can’t go to New York. That is the way kids are, though. Open-minded, carefree, excited for an adventure. We started going through the slides. There were movies, aerial views of different parts of The Statue of Liberty, and a ton of information on how the Lady Liberty was formed and why. The kids seriously were in awe. They had a ton of great questions. They wrote their little hearts out on those four squares trying to fill in as many facts as possible. They were very engaged in the whole process. By the time the field trip was over, it was time to switch classes. When they came back to school the next day the students were still talking about the trip. They talked about how they told their parents that they went to NYC at school yesterday. They remembered facts and details. At this point we started working on our Popplets individually. The students turned their four squares of information into digital information to email to me. They love Popplet because they can change the box sizes, colors, locations, etc. They can personalize their work and save it easily. They are getting really good at exporting the information to me on their own by this point in the school year. Making a Popplet is quick, easy, fun, and effective. Once all the Popplets were made we met together on my big rug. Then we started working on a ThingLink about what liberty means to us. I am always amazed at the students’ answers. They come up with some very thought provoking ideas. The great thing about ThingLink is that we can upload it to the school’s Facebook page. So, even though it is something the class created as a whole at school, every parent can still view it that night. The third day of our project consisted of writing our narrative about the actual field trip. I was very surprised at how well students had retained the information. They knew there were 146 steps leading up to the crown. They knew that the foundation was made of granite and concrete. I truly believe that because the activity was interactive, engaging, and involved technology that students were more excited…that they wanted to learn and be involved in the activity. I love technology and everything that it allows me to do with my students. The possibilities are endless. I have been teaching for 8 years now, and this year I received the best Christmas present ever. One of my students bought me a Statue of Liberty bookmark. Now, that’s magical. I will keep it forever, and I will always remember the day that I took 65 4th graders to The Statue of Liberty.
CHECK OUT OUR THINGLINK …… http://www.thinglink.com/scene/469246669074989058
Virtual field trip link – http://www.nps.gov/stli/photosmultimedia/virtualtour.htm