Thanksgiving ThingLinks

Image

Mrs. Marino’s 4th Grade Class

Are you new to technology and looking for something simple to start off with? I have the tool for you. It is an app called ThingLink. When I say it is simple, I mean SIMPLE! This lesson took all of twenty minutes, but the kids loved it. What is ThingLink? Well, basically it is what the name says. It is a picture of some”thing” with links to some”thing” else embedded in it.  If you look at the picture above there are about twenty different targets on it. If you are on the ThingLink and you touch the targets, something pops up. It can be a website, a picture, words, even a video. In this case it is simple text from my students saying what they are thankful for. We took my iPad down to the Pre-K hall and took a picture of their precious turkey that they have worked so hard on. Good job, Pre-K! We then went into my ThingLink app and chose the turkey picture. When you tap on the picture the option comes up to add text or add media. You choose which one you want. We chose text. Each student told me one thing that they were thankful for. We all listened and commented on each other’s responses. It was a great time of reflection for the kids and myself. I always love to hear what they come up with. When we were finished we passed the iPad around and all had the chance to press the targets and see whose popped up. The great thing about this project is that we then could upload it to the school’s Facebook page. I told my students to make sure they showed their parents their Techy Turkey that night. The kids love when they get to show their parents things that they have created as a whole. Without technology, this would be almost impossible. So what is Mrs. Marino thankful for this year?  The ability to connect with other educators, the ability to teach my students beyond the four walls of our classroom, and the chance to share it all with you.

Making lessons come alive with YouTube & Aurasma

Image

Do you want to hear about something amazing? This summer when I started researching Aurasma I came across one of Erin Klein’s (follow her on Twitter) blog posts on http://www.kleinspiration.com that talked about how she embedded  a YouTube video into a book for her kids. WHHHAAATTT??? I know! I could not believe it. I started thinking about the different possibilities that could happen with these two great tools. There are so many great videos on YouTube that I show my students already. Nouns, commas, verbs, everything. These videos are innovative, funny and they definitely catch my students’ attention. Up until this point, we have viewed the videos as a class. With Aurasma, I can now embed videos into books around my classroom. Now when students have a device, they can hover over these marked pages and view supplemental videos that will enhance skills that we have already targeted that week in class. Because kids are holding the device in their hands and watching a catchy video…learning is fun, learning is interactive, learning is something that they want to do. This is my goal. I want to foster a love for learning in my students that will last a lifetime. How can you do this? Sounds hard? It’s not; I promise. This is what I did:

Hopefully, you have read my previous posts on Aurasma and the power it holds for creating unforgettable lessons in your classroom. If not, please go back and read them, or this may be a little confusing. Here we go. My son loves anything to do with the Titantic. His favorite book is called Headlines. We found a Kid’s National Geographic video on YouTube about the Titanic. We converted the video to an MP4 and used it as the overlay for the aura we created in the Aurasma Studio. Now, when you hover over the picture of the Titanic in his book, the video pops up. So the kids are reading about the Titanic, seeing pictures of the Titanic, and then viewing a video about the Titanic all within one book. Talk about differentiation. Talk about targeting all types of learners. This sounds complicated, but trust me it’s not! If I can figure it out, anyone can. Did I mention that my husband has multiple degrees and most are in computers. He is extremely smart, and for the past 11 years I have depended on him to do anything “technology related” for me. I almost asked him to convert the video for me, but I wanted to prove to myself that this was easy enough for anyone to do. Guess what, I did it by myself. I converted it, embedded it, it worked, and my son thought I was a ROCK Star mom. This process took less than an hour. I would say that less than an hour of your time is nothing compared to the impactful lessons that you are creating for your students. Try it out, and if you need help I am a tweet or e-mail away. Be awesome!

The Aurasma Studio has step by step tutorials for you on how to build an Aura.  It’s simple.  To convert the YouTube video to a MP4, I used a convertor that I found on Google.  

Perfect Presentations with Popplet

Image

Mrs. Marino’s 4th Grade Class

Do you get tired of the same ‘ol graphic organizers? Me, too!  hen I heard about Popplet last April, I was instantly hooked.  The wheels in my head started spinning ninety miles to nothing. Typical. Popplet has endless possibilities for any subject and grade level. That’s why I love it. It is so versatile. No matter what I am teaching, we can make a Popplet to brainstorm or to assess what we’ve learned so far. I have already used Popplet several times this year. Sometimes I use it with my iPad and Apple TV, and we all brainstorm together. Other times the kids are making their own Popplets at their desk. Today, though, something magical happened. My students’ assignment was to make a Popplet using the homophones for “there”. When finished, THEY ASKED to go even further. They added on to the other side of their homophone box (all their idea) and started to do the homophones for “to”. Then they branched off even further and added even more. The part that was amazing to me was when they started helping each other. I like to “steal” the screen with their iPads and project what they are working on. When I put one little girl’s Popplet up on the SMART board the other students noticed that she color-coded her homophones. They instantly wanted to do the same. So, two little girls popped out of their seats and started circulating around the class helping other students. It was a good moment. Plus, it was super cute. The other kids listened, too. They didn’t teach them how to do long division or how to diagram a sentence. They simply taught them a few design techniques for this app we call Popplet. But they used their own voices, and in that moment they were the teachers. And I am beyond proud. I seriously love my job.

The picture below shows a Popplet created for older students. Also, note that on the right side you have the option to e-mail your Popplet straight to your teacher and parents.

Image

Let it Go

Let it Go

Day 4 of iPad camp and this is what I learned – or rather relearned. I was beyond excited because I had a really cool lesson planned. I had planned out exactly what I wanted the kids to do as we worked on creating movies. Thirty minutes in and that all went out the door. I introduced TouchCast first, which has some pretty cool features that you are able to add to the video that you are making. It takes a bit to get used to navigating this tool, or so I thought, so I told the kids to play around with it before we started our project. The really cool project that I planned out. The one that I was super excited for. Because I knew the results would be awesome. Well, as I walked around the room I realized that these kids did not need me to plan out their projects for them. They took initiative and came up with their own ideas. Some really good ideas. I was torn. I really wanted them to do what I had planned, but the creativity was flowing. So, I let it go. I struggled…but I did it. I let them keep going with what they were doing. I am so glad that I did. All the projects were different. They were creative, well thought out, and one of a kind.I was so proud of them. I am positive that they turned out much better than what I had planned for them. Do I think we should never have a plan? No. I just think that as teachers we need to learn to adjust, swerve, roll with the punches. When something comes up that isn’t what we planned, especially with technology, don’t get flustered. Just go with the flow.

ThingLink Celebration Project

scroll over the red bullets on the above image

Today at iPad camp our main focus was to create attention grabbing graphics. Say that three times fast. We used several different apps and created many different visuals throughout the day; however, I want to focus on our ThingLink Celebration Project. If you would like to check out all the apps and tools we used today please check out my website. Our ThingLink Celebration Project focused on The 4th of July. We started off by watching a short YouTube video that you can check out here. Before the students started watching the video I passed out the following really cute graphic organizer.

Screen Shot 2015-06-29 at 11.20.48 AM

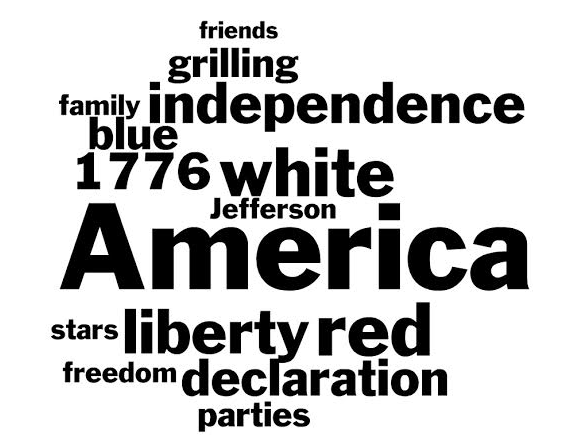
I found this graphic organizer on www.sharemylesson.com, and it was free. The students took notes while watching the YouTube video. We then went to Google Junior (a safe search site for children) and looked for our favorite 4th of July image. I showed students how to save their image to the camera roll. From there we opened our ThingLink app where we added our image. The students then took their notes and made “targets” for each one. The targets are the little red bullets that you see on the image at the top of this page. These targets are interactive. You can add text, YouTube, links, & more. This lesson was a lot of fun, and it was so easy to teach. You could do this at any grade level and with any content. Get creative, and don’t be scared. Your students will pick up how to navigate the iPad faster than you can read this blog. When we finished we took our notes and put them into the Word Clouds app, and here is what that looked like:

Screen Shot 2015-06-29 at 11.18.26 AM

S.A.M.R. – What’s it all about?

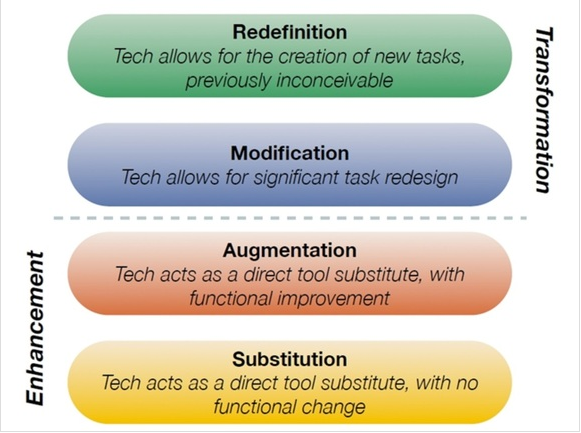
S.A.M.RThis week several faculty members from WISD attended iPadpalooza, which is always my favorite “techy” conference. My awesome friend, Sherri Nicotre, attended a class on the S.A.M.R. Model and sent me some pretty good notes. Thank you, Sherri! So, what the heck is S.A.M.R.? We hear a lot about it in our district because we are 1:1. Kathy Schrock’s definition is pretty good: “SAMR is a model designed to help educators infuse technology into teaching and learning. Developed by Dr. Ruben Puentedura, the  model supports and enables teachers to design, develop, and infuse digital learning experiences that utilize technology. The goal is  to transform learning experiences so they result in higher levels of achievement for students.” Check out her website at: http://www.schrockguide.net/. Here is a simple visual that explains the S.A.M.R. model in greater detail.

Screen Shot 2015-06-27 at 9.59.13 AM

Image the creation of Dr. Ruben Puentedura, Ph.D. http://www.hippasus.com/rrpweblog/

I like to say that this model is the “Bloom’s” for teachers that are using technology. How can we think outside of the box to create lessons, and how can we help our students reach the very top level? We have to model this type of thinking for them, and the S.A.M.R. model will help guide you in the right direction. Sherri took the following notes, which aligns different apps with the different levels of S.A.M.R. If you are overwhelmed by S.A.M.R. or just do not know where to start – the following will be very helpful. Again, thanks to Sherri Nicotre for sending me this information.

Substitution: Popplet, Doodle Buddy, Baiboard, iBooks, Photo Collage, & Symbaloo

Augmentation: Pages, Google Search, Haiku Deck, Chatter Pix, & Morpho

Modification: Thinglink, 30 hands, QR Code readers, Skitch, Flipboard, & Dragon Dictation

Redefinition:  Nearpod, iMovie, Infinite Monkeys, Book Creator, Explain Everything, & Sock Puppets.

KidBlog + WeeMee = Learning 2.0

Image

Mrs. Marino & Maverick Marino’s Kidblog Avatars

Do your students blog? If not, y’all are all missing out. I first heard about Kidblog this summer while attending EdCamp in Region 6. While sitting in Jake Duncan’s class on tech tools in the classroom (follow him on Twitter) two teachers from Brenham mentioned KidBlog. I was intrigued. I instantly wanted to hear more about this blogging business. So, they pulled their KidBlog up right then and showed me what I could do with it. It was absolutely the coolest thing I’ve seen. I believe I started my KidBlog the second week of school. I first sent out a permission slip for all my students ensuring parents that it was safe. Every parent signed YES! Next, my students created their very own avatars using the WeeMee app. We will never post pictures on our KidBlog. My KidBlog is private, so you have to have a password to view it. Also, every comment that is posted has to be approved by me before it actually posts. This is what I love about KidBlog. It is a safe place for kids to be creative, to share their feelings, and to sometimes chat with their friends (when I put a “chat” post up.) My students love to blog. They can’t wait to blog. They beg to blog! They blog at home. ALL THE TIME. So, they are sitting at home willfully answering questions that I have asked them. They are writing at home. They are thinking at home. The skills that they are using to “blog” are covered in my TEKS. They work on capitalization, punctuation, spelling and grammar. They are reflective. It is amazing. I have my KidBlog set-up so that when they blog, I get an email alert. I am not trying to be cheesy, but it is one of the coolest feelings in the world when I pick up my phone and see that I have 14 new posts to be approved. That happens all the time. They blog in my class, and they blog at home. I simply love it. Below are some of our blog topics so far:

1.  What do you miss about 3rd grade?

2.  What is your favorite part in Hank the Cowdog so far?

3.  What is your favorite thing about our iPads?

4.  What are you learning right now in your classes?

Augmented Homophones

Image

Mrs. Marino’s 4th Grade Class

Do your students struggle with homophones? It is a hard concept for young minds to understand. Why do these words sound the same…but they’re not? And how are they supposed to remember which is which? This year, thanks to our classroom iPads, we took homophones to a whole new level. We made it visual. When students hover their iPads over their paper, a video of that student pops up explaining what their homophone means! Not only did we make it visual, the students created the lesson. Not only did they create the lesson, the lesson is saved and will be up for the rest of the year. If at anytime they forget what a certain homophone means, they will just simply have to scan in. I mean, seriously! I am going to try and walk you through this process as simply as possible. If you have any questions on how to do this, please email me. (daisy.marino@warrenisd.net) I would love to help you out. Before you start with the Aurasma part of this lesson, have students make videos on their camera roll explaining their homophone.

1. Download the Aurasma App

2. Create a classroom account

3.  Create a classroom channel (very important)

4. Have students log on to their iPad with the classroom account information

5.  Start creating your Aura (www.kleinspiration.com has an awesome tutorial on this)

5.  Students choose their overlay which is their video on the camera roll

6.  Students choose their trigger image which is the picture of their homophone

7.  Students save this as public

8.  Students add it to the classroom channel

DONE!  The kids can then take their iPad and scan any students’ paper in the class and get their video to pull up. Now, how can parents or other teachers get our images? They need to download the free Aurasma app. Then they need to follow our channel (just like you follow someone on Facebook). Once they follow us, they can hover over any of our images and see the same thing we see.

This is free people!  A free app to enhance your student’s learning. Use it. They will remember these concepts…..more importantly, they will love to learn.

(look closely at the left hand side of the picture above….you can see the homophone picture with  one of my student’s “auras” hovering above it)

Learning in 3D By: Angela Moses

Image

Have you ever been in a hot air balloon? I have not physically been on one.  After this lesson, I sure felt as though I had floated into the sky on a hot air balloon with my students. Thank you to an Augmented Reality App called ColAR Mix (now named Quiver) my lesson became three-dimensional! Teaching the concept of the 3 States of Matter is not a paper and pencil lesson. It should be hands on and visual. We have been discussing the 3 States of Matter for the past week. We have a wonderful online resource called United Streaming. The students and I watched a few videos of hot air balloons lifting off, which allowed the students to see the gas enter the balloon. Before the students colored the hot air balloon sheet, they had to write 2 facts about gas. Then they colored the hot air balloon in any color they wanted. The students were working on-task and independently. Was learning happening in my room? YES!  They were intrigued about the coloring sheet! When they finished coloring, they had to open the ColAR App (now named Quiver) with the iPad and press play. Then they could hover over their hot air balloon. I wish I would have recorded their reactions when the balloons started popping up throughout the classroom. It was hands down AMAZING! Not the normal way to teach the concept of “gas”, but my students know the information! Quiver has many different coloring sheets to print, and it is a great way to engage your students in the lesson. What a great way to bring a story to life! Lots of possibilities with this one.

Skype in the Classroom

Image

Have you Skyped? Me either….until today! I have read about educators all over doing this thing called a Mystery Skype for months now, but I have not stopped long enough to even research it. I’m glad I finally did. Today was my first Skype ever. I am absolutely hooked. Seriously. It was incredible. I was lucky enough to Skype for the first time with Heather Cooper from Flower Mound, Texas. Find her on Twitter. (She also plays a huge role in The World Book Talk…look it up!) Yesterday, when I was scared to death that I was going to mess something up on my first Skype, my friend Angie agreed to practice with me. We sat in her classroom and Skyped each other.  It was hilarious, but we learned how to maneuver our way through a Skype and eased my mind in the process. The first thing I did today when I got to school was hang a huge Texas map up in the hall. That way we can keep track of all the Skypes we do this year. And I plan on doing A LOT!  Then I set up the room. I scooted my pods of desks back to make space for kids to spread around on the floor.  We set up different stations. Three groups had Texas road maps and one iPad. Several people were on desktops.  Two children recorded all the questions and answers and two children asked the questions. When researching how to do Mystery Skypes, I read about the importance of student jobs, and I am so thankful that I did. It kept everything organized. We all knew our roles. Then we waited patiently. We literally stared at my computer waiting for the call. When Mrs. Cooper’s class popped up on our screen, we all started applauding. Mrs. Cooper’s class then lead us through our very first Skype. They were pros. It was so cool to watch them with their dry erase boards and maps and iPads. They asked great questions. They were organized. They were engaged, and so were we. They guessed where we were, then we did the same. My favorite part of this project happened toward the end. We just chatted with one another. They told us about their HUGE city, and we told them about our little town. We have dirt roads and “flood days” at our school. They have highways and “snow days”. We live close to the beach, and they are very close to Six Flags. What did we have in common…Video Games of course. This was a wonderful experience, and I am glad that I get to provide my students with the chance to connect with other towns and cities in Texas. My question for you is….when do you want to Skype with my class??

Image